METR 360 Lab
3
Radiosonde release
To obtain upper air winds, temperature, and dew point, we will set
up and launch a radiosonde balloon with a functioning radiosonde package. These are not standard NWS radiosondes, but
our InterMet-3150 system will give us a realistic taste of how it is done by
the professionals. If you become a NWS
student intern, perhaps you will get to launch one of their radiosondes as
well.
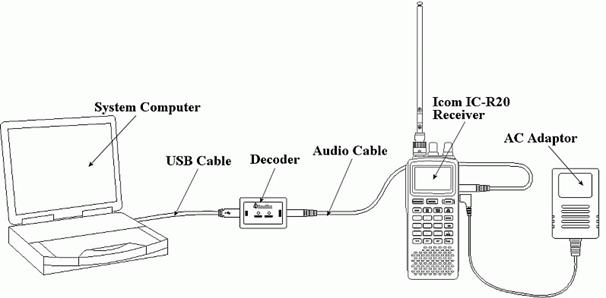
The full radiosonde
setup includes a balloon, parachute, the radiosonde itself, a receiver for the
sounding data being transmitted from the radiosonde, a decoder to change radio
signals into binary data, and a computer program to interpret the data. We will need to set up the entire system,
although parts of it have been initialized prior to this lab. For example, the software has been installed
and its parameters initialized.
The computer we will use
is a Panasonic “Toughbook” which, as its name implies, is a special laptop that
can function while outdoors in the elements.
We will perform this operation even during inclement weather since
that’s when you need the data the most!
If, however, there is a thunderstorm or winds greater than Tropical
Storm strength, i.e., 40 mph, we will not go out on the roof today.
Note that you cannot
release radiosondes without a meteorology professor being present. Do not invite your friends, either unless
they are meteorology students. This is a
meteorology-only activity.
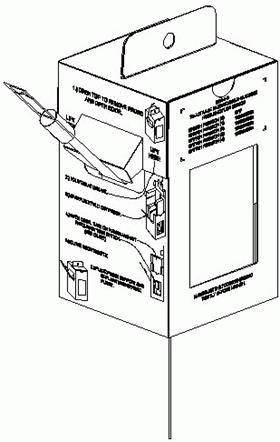
InterMet portable radiosondes are
small, disposable packages, about 5 inches high (plus the antenna which is on
the bottom):
`
The ground station, consisting of the receiver, decoder, and
Toughbook (System Computer) looks like this:
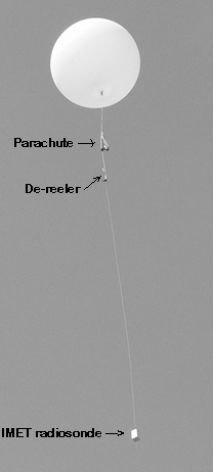
The
“weather balloon” will be inflated with helium until it rises at a rate of 5 m
s-1. We have an inflation kit
to do that. Then a parachute will be
attached to bring the device down safely, a small “de-reeler”
to pay out the string, and finally, the radiosonde instrument itself:
Here’s
the launch sequence:
1.
Your professor will connect the receiver, decoder, and Toughbook.
2.
One student in the class will complete the pre-flight baseline data entry. This means checking the station pressure in hPa, also known as mb.
This is not sea-level pressure – get station pressure directly from the
mercury barometer in the meteorology lab.
Also, baseline data includes Temperature in °C, humidity in %, wind
direction in °,
and wind speed in knots.
3.
A student will start the iMetOS software (it’s the
blue icon on the desktop) and enter the preflight conditions.
4.
Two students will set up the radiosonde.
They will also activate the receiver and tune to the radiosonde. Verify that a strong signal is being
received.
5.
The class will cooperate to inflate the balloon and set up the Flight Train
(balloon, parachute, de-reeler, and radiosonde).
6.
When everything is ready and it is verified that the iMetOS
software is receiving data, the balloon will be launched. Take pictures!
If
all goes well, it may be a while before the balloon bursts and parachutes back
to Earth. Once that occurs, the data
recording is terminated in the software.
Upper level data will be downloaded from the Toughbook and made
available on the course homepage.