Getting Started
Setting up our website home page. View an Example Here
Whats Needed:
- Your Domain Hosting Information!
- Create your class home page. This will be a simple 1 page design to link to our class assignments.
* I encourage you to expand on this intitail tutorial and add your own design and style. As we get more involved in each assignment you can add elements and additaionl pages. - Inculde a simple CSS Menu (We can make this responisve when we get to athat tutorial in Assignment 2.
- Incoprate the new HTML5 and CSS3 elements shown in class. We will expand on these elements in Assignment 1.
Viewport Review
The viewport is the user's visible area of a web page.
<meta name="viewport" content="width=device-width, initial-scale=1.0">
A <meta> viewport element gives the browser instructions on how to control the page's dimensions and scaling.
The width=device-width part sets the width of the page to follow the screen-width of the device (which will vary depending on the device).
The initial-scale=1.0 part sets the initial zoom level when the page is first loaded by the browser. For more about viewport please review w3schools.com
Media Queries
Media queries are useful when you want to apply CSS styles depending on a device's general type (such as print vs. screen), specific characteristics (such as the width of the browser viewport), or environment (such as ambient light conditions). With the huge variety of internet-connected devices available today, media queries are a vital tool for building websites and apps that are robust enough to work on whatever hardware your users have. More infomraiton on media queries from Mozilla Developers site.
Code Examples /
/* Simple fluid media Note: Fluid media requires that you remove the media's height and width attributes from the HTML http://www.alistapart.com/articles/fluid-images/ */ img, object, embed, video { max-width: 100%; }
Fist Level will respond as mobile. Mobile Layout. */400 <
@charset "utf-8";
/* Simple fluid media
Note: Fluid media requires that you remove the media's height and width attributes from the HTML
http://www.alistapart.com/articles/fluid-images/
*/
img, object, embed, video {
max-width: 100%;
}
/* IE 6 does not support max-width so default to width 100% */
.ie6 img {
width:100%;
}
/* Tablet Layout: 481px to 960px. Inherits styles from: Mobile Layout. */
@media only screen and (min-width: 481px) {}
/* Desktop Layout: 960px to a max of 1232px. Inherits styles from: Mobile Layout and Tablet Layout. */
@media only screen and (min-width:960px) {}
To be able to frequently access your student space here are some directions to map and access your web files easily. The first method is just mapped for one time use and will reset after a reboot, and the second method is a more permanent route that allows the mapped network drive to always appear and mount on your desktop after system reboots and user logins.
Map a network drive to Mac
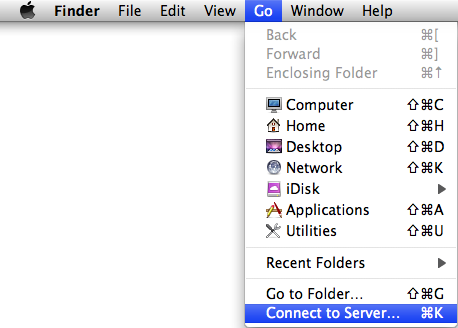
1. Minimize all open windows and single-click anywhere on the background to make sure ‘Finder’ is the active application on the top left of the screen.
2. Once you see ‘Finder’ in the top right corner, click the ‘Go’ button. Scroll down and click ‘Connect to Server’. You can also click Command+K to bring up the 'Connect to Server' window.
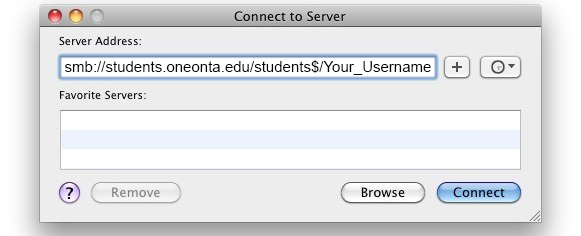
3. Here is where you will type in the path of the homeshare or departmental share you are mapping.
Your path should look like this: smb://students.oneonta.edu/students$/Your_Username
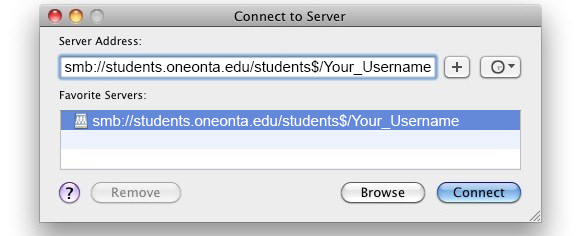
5. Once the path is entered click the “+” sign, which will add this to your connection list on this machine each time you log in, and then click “Connect”. Your student drive should then open and your should see your files located on the server.
(This will be your USB and you should select the WWW folder)
- students.oneonta.edu/username
- Enter Username & Password (Your Oneonta username/password)
click test connection. You have to be on the oneonta network for this to work.
- Click Save
- Click Save
- Always make sure you are working from the Remote Server
Domain & Hosting Information
You will purchase your own domain name and hosting for this class. There are several hosting options out there but I recommend using GoDaddy.com. Below I have broken down the Hosting Puchasing Links and Domain Name links.
GoDaddy will offer you addtional site protection for Personal Privacy for $7.99. I suggest you add is as well otherwise you might get a bunch of solicatation emails and phones calls for web devleopment services.
Overall Cost for this serivce:
1 year Domain Name aproximatley $12.99
Hosting monthly is approximatly $2.99 with a 1 year contact
Personal Privacy protection $7.99
Total cost will be around $65.00.
*Vendors prices are subject to change.