Powerpoint Presentation 2007 ---Advanced Features


GOALS


ABOUT THIS COURSE

This course includes:

  • One self-paced lesson and one practice session for hands-on experience. 
  • The practice requires PowerPoint 2007.

Theme

As a color scheme for your presentation, basic black and white will do the job. But when you're in the mood for more color and a vibrant design, go straight to the PowerPoint themes gallery and try out what's there.

The picture contrasts the default theme, applied to the slide on the left, with one of many others that are available, applied to the slide on the right.

Choosing another theme is no harder than flipping a switch.

See also how to put other elements, such as pictures and captions, on your slides. Then learn some alignment tricks to keep everything neatly arranged.

All the available them is under the Design tab. Click on the design tab and pick a theme.

You can also pick Theme colors and fonts. Buttons right next to the Theme selection.
You can edit the color theme in a template.
Click on Color----go down to the bottom of the template----create new Theme colors----edit the colors.

Background Styles can also be changed.

 theme

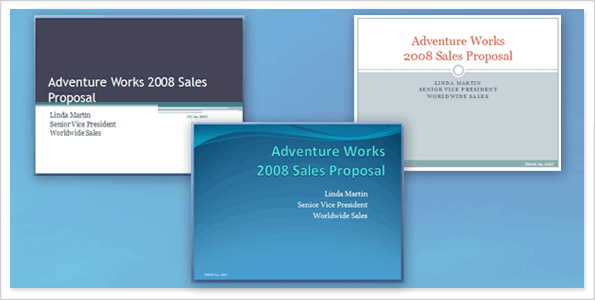
The theme determines the look and colors of your slides and gives your presentation a consistent appearance. Here, you see three title slides that have the same content but that use different themes.

A theme includes these elements, offered as a package:

The color scheme affects background colors, font colors, fill colors for shapes, border colors, hyperlinks, and slide elements like tables and charts.

Regarding placeholders, the theme honors the layout you've chosen, it just moves things around a little. For instance, on the three slides shown, each theme puts the title and subtitle placeholders in a different position. But the basic Title Slide layout is still there.

theme color

Every new presentation starts out with the default theme, called Office Theme. Now see how to choose another one.

To find and apply a theme, click the Design tab on the Ribbon.

Callout 1 Theme samples, in the form of the small thumbnails you see here, are shown in the Themes group.
Callout 2 To see additional themes, click the More button on the right of the group.
Callout 3 When you point to any theme thumbnail, a preview of it is shown on the slide.

Click a thumbnail to apply that theme to all your slides. You can also apply the theme only to the slides you have selected.

Apply a theme at any stage of creating the show. However, remember that themes can alter the position of placeholders, so some will work better than others with your content.

Insert Pictures, Movie, Table, & Clipart

add pictures and things

Now learn two methods for inserting pictures and other non-text items into slides.

In the first lesson, you had a glimpse of the first method, which is to click an icon in a placeholder. The picture illustrates how to insert a piece of clip art.

Callout 1 Click the Clip Art icon in the placeholder.
Callout 2 The Clip Art task pane opens. There, type a keyword in the Search for box that suggests the sort of clips you want, and click Go.
Callout 3 Clips appear that fit the keyword. Click one of them to insert it into the slide.

The picture is automatically sized and positioned within the placeholder.

Other things you can insert this way include tables, charts, SmartArt graphics, your own pictures, and video files.

Caution about inserting pictures    Pictures, particularly high-resolution photographs, can quickly inflate the size of your presentation. Be mindful of ways you can optimize such pictures to make them as small as possible. 

On Angel: you can watch my demo clip titled: Insert picture and clipart.

  1. Get a picture from the Internet or from your image folder.
  2. Click on Insert ----Picture (select the picture you would like to insert)..
  3. You can edit the picture styles---Format---Pick a style.
  4. You can add a picture as a background. Use the "send to back" command.
  5. You can rotate the picture.
  6. For pictures, you can't do picture effects.

Insert a Clipart & Manipulate a clipart

  1. Click on clipart and insert a clipart.
  2. You can add border, add effect, and change shape.
  3. Insert a clipart---click on ungroup---say yes to the pop-up dialog box, click ungroup again.
  4. Ungroup the picture and alter the clipart.
  5. Make sure at the end, you need to "group" the clipart back together to form a new clipart.

On Angel: you can watch my demo clip titled: manipulate a clipart

Add Movie

Do the similar steps  ---Insert---movie---movie from file.


Download this movie clip , if you need a movie file for your assignment.
 

Add Text box, Autoshape, and Wordart

  1. Under your movie clip, insert a caption using text box.
  2. Insert----text box-----type in the caption.
  3. add a WordArt as a caption for the movie 


Spice up your slide with Smartart

smartart1

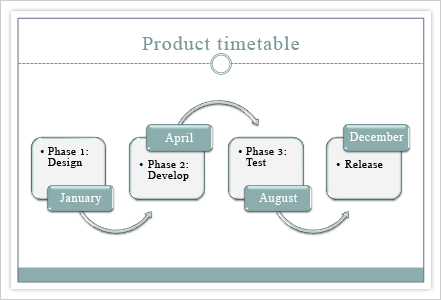
A SmartArt graphic is a visual representation of information — like a diagram — that is very easy to create. Here are some ways to use one.

Layouts for SmartArt graphics are collected in full in the All category within the Choose a SmartArt Graphic dialog box . Then they're broken down into these types:

Insert----Smartart----type in text
smartart2

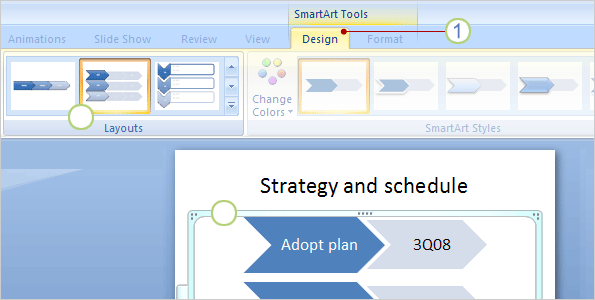
Callout 1Using the DESIGN tag----

1. You can add additional shapes or delete extra shapes.

2. Change colors and the Smartart style.

3. Right click on the individual shape, you can format shape (there are many different options, including edit the text.)


Insert and Edit Photos

Please watch video clip on Angel for demonstration-----photo1.wmv

Create a Photo Album for your Presentation

You've got photos and you want to display them in a slide show. The first thing you need to do is get the pictures onto your computer.

To do so, follow the guidelines that came with your scanner or camera to upload your picture files. Some software will save the files to your Pictures folder by default, and might create a subfolder for you named by the day's date.
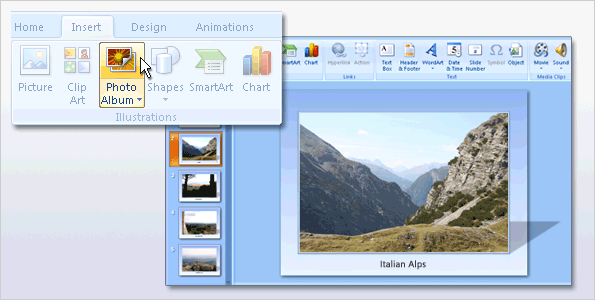
If you have many pictures you want to display in a Powerpoint format, you want to use the "photo album" feature.

Insert----Photo Album----add pictures----text box if needed----layout (1, 2, or more pictures in a slide)---Pick a theme.

photos1

 Edit Photos

Here's an example of how cropping and resizing can improve the way you display your pictures.

Callout 1 In the top example, the pictures' original sizes vary, being either more horizontal or more vertical.
Callout 2 In the bottom example, the pictures are cropped and resized to be a uniform shape, and they're all slightly bigger. (Another help is that they have sharper frame formatting.)

Important    If you crop and then enlarge a picture, make sure that the picture has a high enough resolution that it won't appear blurry when projected. Resolution refers to the density of pixels, the small dots of color that make up bitmap images. When you preview your slides in a slide show, you can tell whether the images are sharp or not. For more about picture resolution, see the Quick Reference Card at the end of the course.

On angel, you can download or watch a demonstration clip----- photo2.wmv 

 Control your presentation's file size

 photo size

Digital photographs can be huge in terms of file size (3 to 4 megabytes, for example). Those large file sizes contribute to an inflated presentation file size, too. However, PowerPoint 2007 has ways to keep your file size manageable.

One is automatic picture compression. When you insert a photo, PowerPoint reduces its number of pixels. In high-resolution (meaning high-pixel-count) images such as photos, there's often pixel data that you can lose while still retaining fidelity in the picture. So, the image doesn't look different in the projected presentation, but its file size is smaller.

In addition to automatic compression, you can use the Compress Pictures button, on the Format tab, to apply more compression. This further reduces the pixel count per inch. The Screen option (150 ppi, or pixels per inch), as shown above, is the optimal choice for projection.

 Back to Course Menu