OBJECTIVEAfter completing this course you will be able to:
|

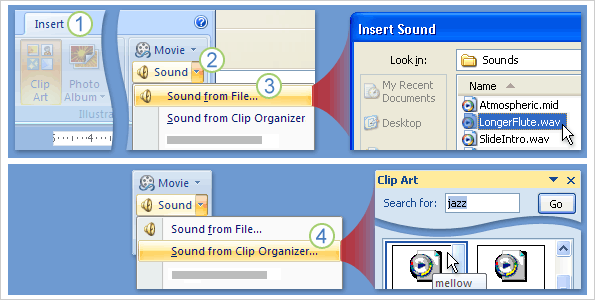
These steps show you two ways you'd insert the sound using the Insert tab:
 Click the Insert
tab.
 Click the arrow next to Sound.
 To insert a sound file from your
computer or a network server, click Sound from File.
Browse to the file, and double-click it to insert it.
 To insert a sound from the clip
library, click Sound from Clip Organizer, and search
for the clip in the Clip Art task pane. Scroll to
the clip you want, and click it to insert it onto the slide.
To insert a sound from the clip
library, click Sound from Clip Organizer, and search
for the clip in the Clip Art task pane. Scroll to
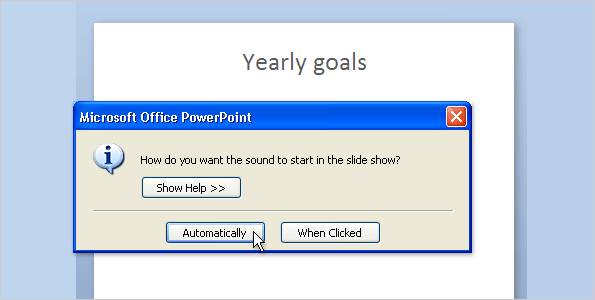
the clip you want, and click it to insert it onto the slide.Before the sound is inserted, you're prompted with a message asking how you want it to start (the choices are discussed later in the lesson).
The sound appears as a sound icon on your slide, and it plays right after you insert it, so you know what it sounds like. To hear the sound again in normal view, double-click i
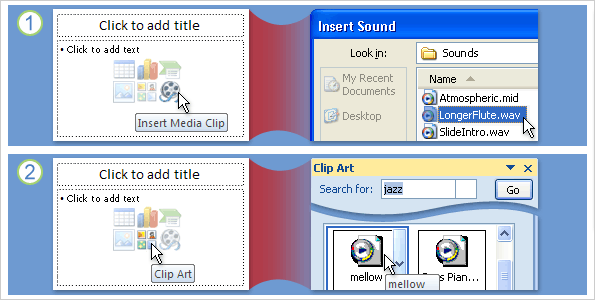
You can use the icons that are part of some slide layouts to insert a sound file, too. The effect is the same — you are inserting a sound file, but you do it from within the slide instead of using the Insert tab. The slide must have a layout that includes a content placeholder, as shown in the picture.
The content placeholder is the area outlined by a dotted border on the slide. Your content goes within this border. When you see the icons, as shown here, you'll know that this placeholder can contain text or other things, such as pictures, sounds, or graphics.
 Click the Insert
Media Clip icon to browse for sound files on your computer or a
network server.
 Click the Clip Art
icon to open the Clip Art task pane and search for sounds to insert.
Click the Clip Art
icon to open the Clip Art task pane and search for sounds to insert.The sound is inserted within the placeholder, in the form of a sound icon.
What are the benefits of this method? You may want the sound icon to always appear in a certain position on your slides. For example, if you created a self-running presentation in which a person had to click the sound icon on each slide, you might like the icon to be in the same placeholder and position every time.
Note that PowerPoint will still use content placeholders, if any are available, for an inserted sound even if you insert the file by using the Insert tab — and will put the sound icon in the middle of the placeholder. The content placeholder icons just give you a handy method for insertion and guarantee that the sound will be positioned in that spot.

In the process of inserting the sound, you're prompted with a message asking whether you want the sound to start automatically or when you click the mouse.
Choose Automatically if you want the sound to start by itself. If you have no other media effects on the slide, the sound plays when the slide is displayed. If you already have another effect on the slide, such as an animation, sound, or movie, the sound plays after that effect is finished.
Click When Clicked if you want the sound to play when you click the sound icon on the slide. This setting is known as a trigger, because you have to click something specific (the sound icon) to play — trigger — the sound.
If you change your mind about how you want the sound to start, you can make a different selection later.
Note You can set up other things on the slide as well — text, a shape, or a picture, for example — to trigger the sound.

So, you've inserted the sound, and it starts either by itself or when you click the sound icon. The sound will play through to the end and then stop — unless you click the slide for any reason while it is still playing, which will stop the sound.
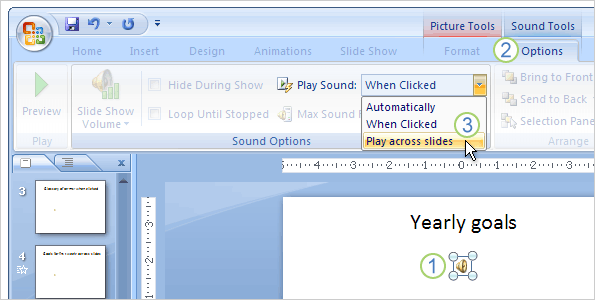
What if you have a long-playing sound, and you want it to keep playing even when you click the mouse to start something else on the slide (such as an animation effect or movie clip), or to advance to the next slide? You can make it play across slides.
 Select the sound icon.
 On the Ribbon, under Sound
Tools, click the Options tab.
 In the Sound Options
group, in the Play Sound list, select Play
across slides.
In the Sound Options
group, in the Play Sound list, select Play
across slides.This sets the sound to start automatically when the slide is displayed and to keep playing no matter what you click, until it's finished or you reach the end of the show, whichever comes first.
You may want to make further adjustments to the sound. For example, you may want it to play through the current slide only and then stop, or to stop after a set number of slides. You would make these adjustments by using the Custom Animation task pane.To guarantee that a sound will play from the computer you present on, be aware of some details concerning the size of sound files, and whether a file has been linked to in the presentation, or embedded within it. Your main concern is that any files your presentation links to must be in a place where PowerPoint can find them.
A linked file is not actually contained within the presentation. Instead, PowerPoint creates a link to the file based on where it's stored when you insert it into the presentation. For example, it might be on your computer, or on a server that your computer is connected to. So when you "insert," you're really just creating a link to the file. PowerPoint relies on that link to find and play the sound.
The tricky thing is that if you move the sound file to a different place, so that the link to it isn’t valid anymore, or you present on a computer that doesn't have access to the sound file, PowerPoint won't find the sound file to play it.
The next screen tells you how to prevent this.
What determines whether a sound file is inserted as a linked file? File size and file type. PowerPoint creates a link for any .wav type of file that is more than 100 kilobytes (KB) in size and for all other types of sound files, regardless of size. (The last four characters of the file name — for example, ".wav" — tell you what type of sound file it is.)
An embedded file is part of the presentation. If you copy the presentation to another location, the embedded sound file travels with the presentation and you can count on it to play.
What determines whether PowerPoint embeds the file? Again, file type and file size. If the sound is a .wav file that is 100 KB or less in size, it's embedded.
Remember The presenting computer must have a sound card and speakers to play your sound effects.
Under the Insert tab, click on the Object button.
A pop up box shows and you can choose to either create a new object or to insert one from file.
You can add a Word document, an art work, movies (covered in Lesson 2), ...etc.
Internal links---- Links that take you to another slide.
External links----Links that link to a webpage, starting an email, open a Word document, or start playing a movie.
You can control the speed of the transition and add sound effect to the transition.
Animate (animate: To add a special visual or sound effect to text or an object. For example, you can have your text bullet points fly in from the left, one word at a time, or hear the sound of applause when a picture is uncovered.) the text or objects (object: A table, chart, graphic, equation, or other form of information. Objects created in one application, for example spreadsheets, and linked or embedded in another application are OLE objects.) in your presentation to give them sound effects or visual effects, including movement. You can use animation to focus on important points, to control the flow of information, and to increase viewer interest in your presentation.
You can use the built-in animation effects in Microsoft Office PowerPoint 2007, or you can create your own custom effects. You can apply animation effects to individual slides, to the slide master (slide master: The main slide that stores information about the theme and layouts of a presentation, including the background, color, fonts, effects, placeholder sizes, and positions.), or to custom slide layoutsTo apply a built-in animation effect in Office PowerPoint 2007, do the following:
To apply a custom animation effect in Office PowerPoint 2007, do the following:
Note Effects appear in the Custom Animation list in the order that you add them.
Play (test) the effect by click on Play on the bottom of the control panel.If you would like to show each item separately, click on the item (on the right side of your screen), and click on the drop down box-----a drop down menu would show. You can control the sequence, add more effect, and change timing of the effect...etc.
You can always change the animation effects or Remove the effect by using the custom animation control panel.
To see how to add and format slide footers :
Download this movie clip , if you need a movie file for your assignment. (this is the same one you found in Lesson 2)
Sample Audio Clip Download 1, if you need a clip for your assignment.
Back to Course Menu